Wednesday, May 5, 2010

MYKA BLOOMS


CLICK THE TAG TO SEE IT FULL SIZE


This Tutorial was written by me, Angel Flower, from my own ideas. Any similarities to others is coincedence. All my tutorialsare registered with TWI.

For this tutorial you will need A tube of choice. I have used the work of Myka Jelina. In order to use the image in this tutorial you MUST purchase it from CILM.

Filters-Xenofex 2 rip open,

Animation shop

You will also need to download my flower here or use one of your own.

New image- 600x600

Paste my flower as a new layer

Resize it by going to image-resize, resize by 110 percent.

Paste your tube as a new layer an position how you like.

Right click on the tube layer and go to layers-merge visible.

Go to effects-distortion effects-twirl at -720.

Again, paste the flower and resize as we did above. Paste your tube again as a new layer.

Give your tube a drop shadow by going to effects-3d effects-drop shadow, 1,-2, 100, 5, and black.

I did not resize my tag but if you want yours smaller resize it now by going to image resize and make sure all layers arechecked and lock aspect ratio is checked, chosse pixels and put the size you want.

Now add your name in a font of choice. I used JOKERMAN font. Go to effects, edge effects, enhance, and just say ok when it says it needs to convert to raster. Now to turn your name you can do one of two things. The easiest way is to use the pick tool(the lil arrow tool), and when you see the box around the name you also see a line with a little tiny box in the center. Hover the mouse over the little tiny box and it will turn to arrows. When you see the arrows click and hold down the left mouse button and turn it in the direction you want it. Once happy with it, move it into postion.
The way I did mine was to first click the pick tool, hover the mouse over the tiny square on the left side of the name.You will see it turns to a straight arrow going side to side. Hold down the shift key and the arrows point up and down.While holding the shift key down, click and hold the left mouse button at the same time and slide the box up to where you want it. Once happy with it, move into position.

Give your name a drop shadow same as above only changing the -2 to a -3.

Add your copyright so it is clearly visible.

Duplicate your flower layer and move it to the top.

Duplicate this one until you have a total of seven. Hide all of these flower layers. Starting with the layer on top, leave thisone as it is and keep it closed. Unhide the next flower layer and on this layer go to effects, plugins, xenofex 2, rip open- curl size 10, curl amount 1, curl variation 80, roughness 5, shadow width 2.83, click the make selection transparent, color white. Hide this one again and open the next one.

Repeat the rip open filter changing only the curl amount to 15. Repeat the filter hiding and unhiding the layers as you go with the following settings for the curl amount:
On the next one change it to 25.
The next one is going to be 30.
Then 40, and the last one is 50.

Now make sure all the flower layers are closed and unhide only the flower on top which should be the normal flower that we left alone.

Click this layer to make it active and add your name again in the same font with the same edge enhance effect. Place your name over the center of the flower and make it small enough to fit the center. Give it a drop shadow.

Duplicate this layer and move it below the top flower layer. Now hide the top flower layer and Unhide the second flower layer.With your eraser tool on a size of 24 or smaller, erase any part of the name that is not on a petal. Once done, close both this name layer and flower layer.

Open the top flower layer and name layer. Now we are going to animate.

Go to edit, copy merged, Go to animation shop, Paste as new animation.

Back in psp, close off the top name layer and the top flower layer. Open the erased name layer and the second flower layer. Edit, copy merged, back to animation shop, edit paste after current frame.

Back in psp, close off the second flower layer and the erased name layer and open the third flower layer. Copy merged, back to animation shop, paste after current frame.

Back to psp, close the third flower layer and open the fourth, copy merged, back in animation shop, paste after current frame.

Repeat these steps for the fifth, sixth and seventh flower layers. Once you have that done, In psp, close off the last flower layer so now all your flower layers that are above the tube layer should be closed. Click one of the visible layers to make it active and go edit copy merged, and go back to animation shop and paste after current frame.

Now still in animation shop go to edit select all, then go to animation frame properties and change it to thirty, then go back to animation and this time choose animation properties and choose opaque and color is white. View your animation and save.

thats it, you are done.

©Angel Flowers Tutorials 2010
Tuesday, March 16, 2010

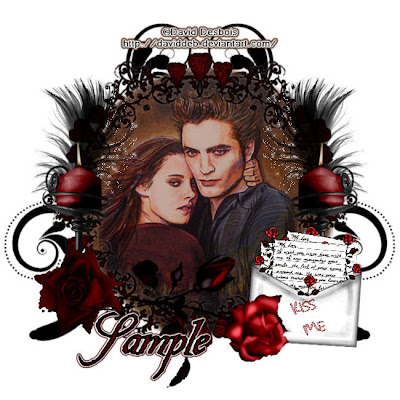
Fallen For You


Click the tag to see it full size.
This Tutorial was written by me, Angel Flower, from my own ideas. Any similarities to others is coincedence. All my tutorialsare registered with TWI.

For this tutorial you will need A tube of choice. I am using the work of David Desbois http://daviddeb.deviantart.com/. You must have permission to use his work.

Scrapkit- This kit is called My Fallen Valentine by Crimson Butterfly Scrapz. You must purchase this kit at http://www.digifoxsstudio.net/ or http://www.digitalchaos.net/ to use it.

Filters used-Xenofex2 constellation(optional) Eye Candy 4000 gradient glow(optional)

New Image- 600x600 transparent. Copy and paste the frame3 as a new layer. Resize it by going to image-resize-80 percent, all layers unchecked, lock aspect ratio checked. Then resize again by 85 percent.

If you are going to use a paper for your fill, paste it as a new layer. Resize by 70 percent. Move this below your framelayer. Make your frame layer active. Grab your selection tool and set to ellipse, feather 0, anti alias checked. Drawa selection around your frame without going outside the edge of the frame. This may take a few tries to get it quite right.Selections invert, on your paper layer hit delete. Now you should only have the paper inside the frame. I chose to use a color for my fill. Instead of pasting a paper, I drew my selection, added a new layer and flood filled it with my color. Then i moved my fill layer below my frame layer.

I gave my frame a very slight white drop shadow of 0,0,50,5.

Paste your tube as a new layer. If it needs to be resized use the same method we did above and start with about 85 percent. If its still too big, repeat this, if it is too small, undo and change the percentage. The other way to resize if you need just a little is to grab your pick tool, grab the box around the tube by a cornter and drag it slightly to the size you want. Dont worry if just a little of your tube hangs over, we will fix that. Make your fill layer active. Go to selections, select all, selections float,then defloat, selections invert and hit delete on your tube layer. Make sure this layer is above the paper but below the frame.

Open candle1 and paste as a new layer. Resize it about like mine and place on one side of your tag. See my tag for reference.Once happy with the placement, duplicate and mirror. You may need to postion this one slightly. Now you have one on each sideof your tag.

Copy and paste the rose3 as a new layer. Resize and position on the left side of the tag so it covers the bottom of the candle. See my tag for placement.

Copy and paste rose2 as a new layer. Resize just a little and go to image free rotate, 90 degrees right, both boxes unchecked. Positiontoward the bottom of the tag with the end of the stem further toward the other rose we placed. Move this layer below the other rose layer. Again see my tag for how this should look.

Copy and paste the envelope as a new layer. Resize it about like mine. Move below the rose layer. Position it so it sits on the right side of the tag. I slighly rotated mine using the pick tool. Then i went to effects, edge effects, enhance. See my tag for how this looks.

Copy and paste the feather2 as a new layer. Resize it to your liking or about like mine. Move this layer below the candle layers. Position on the left side of the tag so it sticks out above the candle some. See my tag for placement. Once happy with it, duplicate it and mirror. Put into position if necessary.

Give each feather the same drop shadow we used earlier. Now the next part is optional. I added a slight constellation to mine using xenofex2,1.98, 22, 9, 0, 80, 75, rotation 45, keep original, and click random seed once. Do this for each feather.

I then added a flourish1 to mine and moved it under all the layers. I positioned it to the right of the tag, resized it, then duplicated it and mirrored it.

I did not resize my tag but if you wish to resize yours now is the time to do so. Go to image resize, all layers and lock aspect ratio both checked. Change the percent to pixels and choose your size. When you change one, the other automaticly changes.

Now add your copyright info so it is clearly visible. I added a gradient glow of 3 to mine from eye candy.


Now add your name in a scripty type font. Postion where you like or how i have mine. If you wish to add a glow, convert to raster and go to eye candy 4000 gradient glow, under the basic tab 3,25,100, under the color tab the first tab should be white, I added a second white tab, and then i added a third taband changed the color on the third one to the dark red in the name, opacity 100. You may also give your name a black drop shadow if you wish.

Thats it, you are done.
©Ange Flowers Tutorials March 2010


Sunday, January 17, 2010

Lillian and Melita


Click the tag to see it full size.
This Tutorial was written by me, Angel Flower, from my own ideas. Any similarities to others is coincedence. All my tutorialsare registered with TWI.

For this tutorial you will need

Two tubes of choice. I am using the work of Myka Jelina. In order to use the image in this tutorial you MUST purchase it from CILM.

Filters- Kang 4 bubblecross waves and bat wave
Eye candy 3.1-HSB noise
Dsb flux-linear transmission

New image-600x600 transparent.

Paste your main tube as a new layer and position in the center of your canvas. If it needs to be resized you can resize one of two ways. The first is to go to image-resize-make sure the first drop box says percent and not pixels, start with 85, all layers unchecked, lock aspect ratio checked, and for the resample box choose smart size.If it is still too big, repeat those steps. If it is too small then go to edit, undo, and repeat the resize using a larger percent. The other way to resize is to click the little arrow tool, also known as the pick tool, and you will see a box around your tube. Grab the box by a corner, this will keep it proportionate, and carefully drag it to the size you want. You will need to repostion your tube if you use this method. Any time I say to resize and i do not specify, you may choose to use either of these methods.

Click your preset shape tool and set it to ellipse with a width of 7. Make your foreground color black or a dark color from your tube, and your background color a lighter color from your tube.


Draw out a shape about the size of mine. Position it so that it looks as though your tube is sitting in the cirle or standing in front of it if you chose a standing tube.

Grab your magic wand tool-mode is add, match mode is rgb value, tolerance 20, feather 0, anti alias checked, and choose outside in the last drop box. Click in the center of your circle.Keep selected. Right click on the circle layer and choose convert to raster. Now go to effects, plugin-Kang 4-batwave - x frequency 180- y frequency 124- this works with that 46- this works with this-98- orientation mode 19- carving light 35- style light 27- color cycle 233. KEEP SELECTED.

We need to colorize this to match our tube. Go to adjust-Hue and saturation-you can either choose colorize or hue/saturation/lightness-if you choose colorize, simply move the first bar to the color you want, and the second one to make it more or less colorful. If you choose hue/saturation/lightness, check the colorize box, move the top slider bar that goes across(this is the hue)to about the color you want, then move the saturation and lightness bars till you get just the right shade. Keep selected.

Again go to your kang 4 filter, this time choose bubble crosswaves-x freq. 224- y freq. 206- x ampl. 154- y ampl. 154= bubble cross 129. Now go to selections-select none.

Give your tube a drop shadow by going to effects-3d effects- drop shadow, i used vertical -2, horizontal 0, opacity 75, blur 10, color black.

Click on your blank background layer. Grab your preset shape tool again but this time choose rectangle. Make your foreground color the same that you used for your circle but change the background color to a medium color to match your tube. Draw out a rectangle almost the width of the canvas and slightly shorter than your circle. See my tag for the size and placement. It should be almost centered under the circle.Convert to raster.

Now click on your circle layer. Paste your other tube as a new layer and resize it. Position on one side of the circle about how i have mine. Dont worry about any excess that hangs over the rectangle. We will fix that. Once happy with the position, go to image-duplicate, and then image mirror. You should now have one on each side. Double click on one of them and change the blend mode to hard light. Do the same for the other one.

Now grab your magic wand tool with the same settings as before. Click on the rectangle layer to make it active. Now click inside the rectangle with the wand. Go to selections invert. Click on one of the tube layers we are using and hit delete on your keyboard. Click on the other one and do the same thing. Now all the excess tube is gone. Go to selections invert. Keep selected.

Make your rectangle layer active by clicking it. Go to effects-plugins-eye candy 3.1-HSB noise- hue 0, saturation 18, brightness 36, opacity 0, lump width and lump height 12, random seed 1. Keep selected. Go back to plugins-kang 4-bubble cross waves with same settings as before. Selections-select none.

Give your circle layer a drop shadow of 0,0,100,10,black. You may give your rectangle layer the same drop shadow if you wish.

Hide your top tube layer, this should be your main tube, by clicking the eye next to it. Now right click on any other layer and go merge visible. Now you should have two layers. Unhide the tube layer now. Click on the merged layer we made. Duplicate this layer. On the bottom copy go effects-plugins-dsb flux linear transmission-size 5, offset 5, blend 0, vertical clicked. Go effects, edge effects, enhance.

Almost done. Before we add anything else, this is the time if you wish to resize your tag to do so. To do this you must use the image resize method. This time make sure the box says pixels instead of percent, make sure all layers is checked and change the pixel size to the size you want, when change one the other will change too so the tag stays proportionate.

Now we can add our copyright. Click on your top layer and add a new raster layer. To do this just go to layers, add new raster layer. Add your copyright. Make sure it is clearly visible. I usually add a gradient glow either white or a color to match but that makes it more visible with a size of 3, or a white drop shadow.

Now we will add our name. Click on your text tool which is the A. Choose your font. Choose the colors for the foreground and background that match your tube. You may use whatever font and size you like. To do it like mine i used a font called neuropol at a size of 72. Place how you like or how i have mine. Convert to raster. Go effects-edge effects-enhance. Now grab your magic wand, same settings, and click inside each letter. Go to effects-eye candy 3.1- and use the hsb noise with the same settingswe used earlier. Keep selected. Go to plugins-kang 4-bubble cross waves with these settings x and y freq 255, x and y amplitude 120, bubble cross 0. Selections- select none.

You can give your name a drop shadow if you wish.

Thats it, save and you are done.
©angel flower January 2010