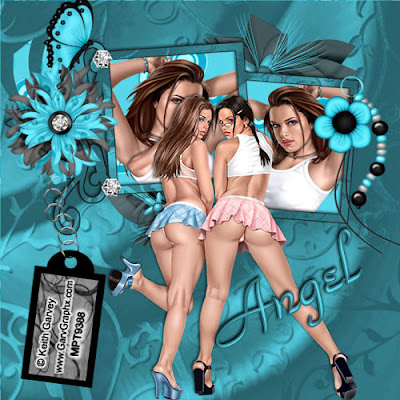
This Tutorial was written by me, Angel Flower, from my own ideas. Any similarities to others is coincedence. All my tutorialsare registered with TWI.
For this tutorial you will need
Scrapkit. I am using a PTU kit called Blaqua by Shhh from Shhh scraps. You can purchase the kit here: http://www.fall3nangel.com/store/
Tube of choice-you will need two tubes. I am using the work of Keith Garvey. You must purchase a license from MPT, http://www.mypsptubes.com/, to usehis work.
Lets begin.
New image-600x600-transparent.
Add a new raster layer. Flood fill with white.
Choose a paper from the kit and paste as new layer. If it is too big, resize it by going to image-resize-start with about 85%, all layers unchecked.If it is still too big you can repeat this step.
Paste a frame as a new layer. Resize if needed using the pick too, the arrow tool, and drag the box by a corner to the size you want.
Grab your magic wand. Mode is add, match mode is rgb, tolerance 20, feather 0, contiguous and anti-alias checked.Click in the center of each frame. Go to selections-modify-expand by 2. Keep selected.
Make the paper layer you pasted active and go selections-invert-delete. Select none.
Give your frame layer a drop shadow by going effects-3d effects-drop shadow. I used -2,-2, 65,5,black.
Give your frame layer a drop shadow by going effects-3d effects-drop shadow. I used -2,-2, 65,5,black.
Make a new layer right above your white background. Paste a paper of choice for your new background. Resize it if needed.
Make the paper we used for the frame active. Paste the tube you want inside the frame as a new layer. If needed, resize, position it so the part you want to use shows through the frame.
My frame had two sides so Once happy, duplicate your tubeand go image-mirror. Position this one so it shows through the second frame the way you want.
Grab your magic wand, same settings as before, and make your frame layer active. Click in the center of each side and go selections-invert. Make the first tube active and hit delete, do the same on the other tube layer. Select none.
Paste a charm as a new layer. Resize if needed. Make sure this layer is above the frame layer.
Position so it looks as though it is hanging off of the corner of the right frame. See my tag for reference.
Choose a flower and paste it as a new layer. Resize it if needed. Position on the left side of the frame. See my tag for placement.
Grab a different flower and resize if needed. Move this layer below the frame and frame paper layer. Position so it sticks out from underneath the frame in the center. See my tag for reference. Once happy with it, duplicate it and go image flip. Position this oneat the top center of the frame in the same way.
Now paste your main tube as a new layer. Position how you like or how i have mine. Give them a drop shadow of choice.
Paste one of the tags as a new layer. Position on the left side of the tag and move it below the flower layer. See my tag for reference.
I also pasted a butterfly at the top left corner under the same flower.
Now is the time to resize your entire tag if you think it is too big. Go to image-resize-make sure lock aspect ratio is checked. In the drop down box, choose pixels, and then make the size you want. When you change one the other will automaticly change. Make sure all layers is checked and click okay.
Add your copyright and postion it on the tag. Make sure it is clearly visible.
Add your name. Give it a drop shadow and position how you like.
Thats it, you are done.
©Angel Flower January 2009
No comments:
Post a Comment