Thursday, February 5, 2009

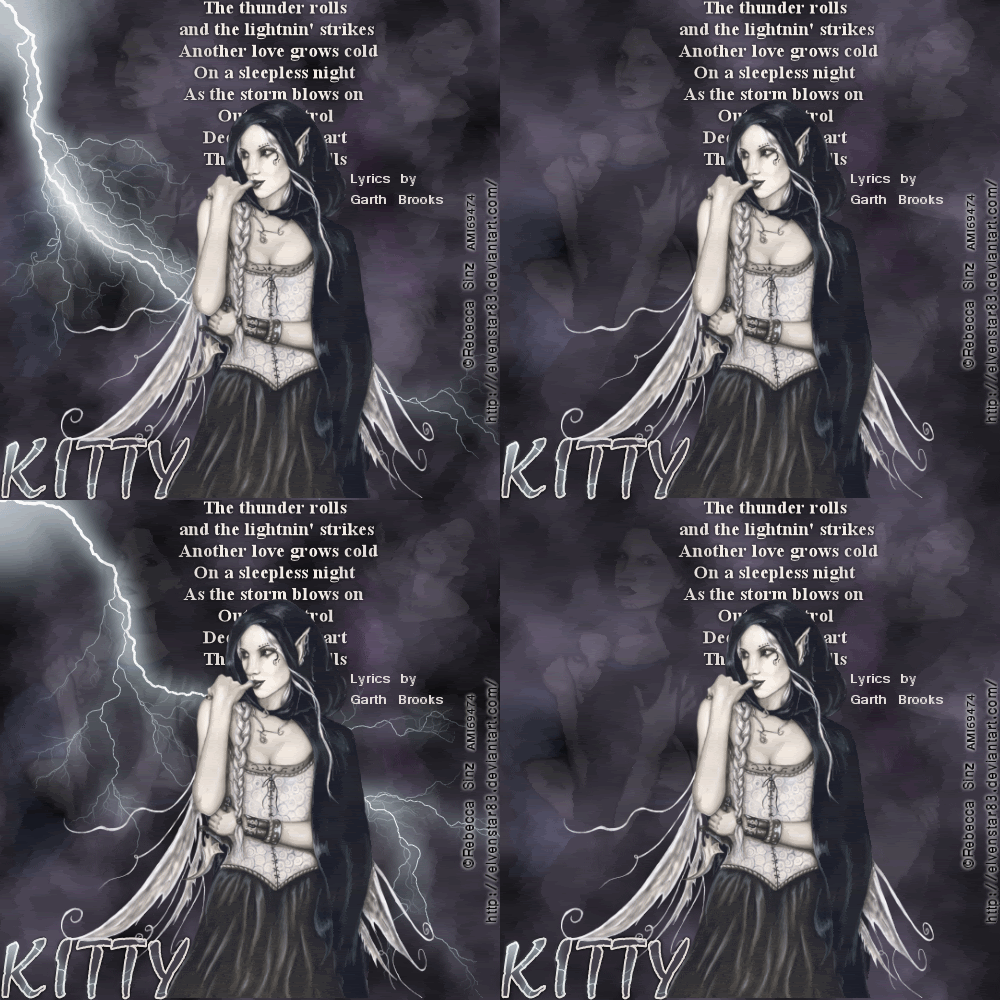
Thunder Rolls

Click the tag to see it full size.


This Tutorial was written by me, Angel Flower, from my own ideas. Any similarities to others is coincedence. All my tutorialsare registered with TWI.


For this tutorial you will need


Three tubes of choice from the same artist. I am using the work of Rebecca Sinz. You must purchase a license from AMI, http://www.artisticmindsinc.com/, to use her work.

Filters- Xenofex 2 and Mura's Meister cloud

New image-500x500-transparent.

Flood fill with a gradient to match your tube. I used a linear style, foreground/background, angle of 45 and 0 repeats.


Duplicate this layer twice for a total of three.

On the top one, go Effects-plugins-mura's meister cloud-the top color is white, the middle black, and the bottom one a color from your tubes. Effect 100, amount 100, grain 3, all others are 0. Repeat on the middle one but change the amount to 115. And once more, repeat on the bottom one only change the amount to 130. Hide the bottom two layers by clicking the eye next to them.

Paste on of the tubes as a new layer. Resize if needed just a little using the pick tool, the arrow tool, and drag the box by one of the corners to the size you need. Postion in the top left sideof the tag. Right click on the layer and change the opacity to about 9. You may need to adjust this depending on your tube and colors chosen.

Paste the second tube and resize the same way. Position in the top right corner and again change the opacity to about 9, or whatever amount you used on the first tube.

Paste your main tube as a new layer. If needed resize. Position in the center of the tag. See my tag for reference.

Make your top cloud layer active and add a new layer. Go to effects, plugins, xenofex2-lightening-under the basic tab, 16,92,90,36 and click random seed once. Under the glow tab, 50,71,73, and the colors are white for inner and a very light aqua for outer.okay.

Add another new layer and repeat the lightening effect with the same settings clicking the random seed button again.

Hide the bottom lightening layer.
Make your main tube layer active and add a new layer. Move this below your tube layer. Type out the words or lyrics of your choice. I used a size of 24 for my text. Position in the top center of your tag. See my tag for reference.

If you made your tag larger then mine and wish to resize it, now is the time to do so. Go to image resize, make sure all layers is checked and choose your size.

Add your copyright so it is clearly visible.

Add your name. Convert to raster. Give it a slight drop shadow. Go selections-select all-float-defloat. Use the lightning effect we used earlier. Selections-invert-hit delete. Select none.

Now for the animation.

Make sure your top cloud layer is visible and the other two are hidden, and make sure your top lightning layer is visible, and the other two hidden. Go to edit-copy merged.

Go to animation shop and paste as new animation.

Back to psp, hide the top lightning layer, DO NOT unhide the other one yet, Hide the top cloud layer and unhide the middle cloud layer. Edit-copy merged.

In animation shop, paste after current frame.

Back in psp, hide the middle cloud layer and unhide the bottom cloud layer. Unhide the bottom lightning layer. Edit-copy merged.

In animation shop, paste after current frame.

One more time, in psp, hide the bottom cloud and lightning layers, and unhide only the middle cloud layer. Copy merged

In animation shop, paste after current frame. Go to edit-select all. Now go animation-frame properties-set to about 45. Veiw animation.
Thats it, your done!


©Angel Flower February 2009

Dark Angel


This Tutorial was written by me, Angel Flower, from my own ideas. Any similarities to others is coincedence. All my tutorialsare registered with TWI.

For this tutorial you will need

A tube of choice. I am using the work of Michael Calandra, you must purchase a license from MPT, http://www.mypsptubes.com/, to use his work.

Mask of choice. I am using a mask by essex girl, which you can find here http://www.essexgirl.uk.com/sg_masks_index.htm

New image-600x600-transparent.

Flood fill with white.

Paste your tube as a new layer. Position to the right side of your tag. If needed, resize using the pick tool, the little arrow tool, and drag the box by a corner to the size you want it.

Duplicate your tube layer twice for a total of three. On the very top one, click the little eye next to it to hide it.

On your bottom tube layer, go to image-mirror.

Merge the two visible tube layers together by right clicking on the one on top, not the hidden tube layer, and go merge down.

On this merged layer, go to adjust-blur-radial blur- blur type is twirl, strength 29, twirl degrees 45, elliptical checked, H and V offset is 0, protect center is 27.Repeat the blur step one more time.

Unhide the hidden tube layer.

Make your white fill layer active and add a new layer. Pick two colors from your tube for the foreground and background. In your material palette, choose gradient, linear style,Foreground/background, angle 45, repeats 0. Flood fill the new layer with this gradient.

Go to layers, load/save mask, load mask from disk, and in the drop down box find the mask you want to use. Source luminance, invert, hide all, and fit to canvas all selected. Load.

Now, i thought this layer looked too light so i clicked on my white background layer and filled it with black. Make the mask layer active and right click on it, choose merge group.

Give your tube layer a drop shadow of choice.

We are now going to add a border. Go to image-add borders-symmetric checked and all directions are 10, choose a dark color to match your tag. Now repeat the add border, but change it from 10 to 25, and choose an opposite color,I used white, doesnt matter what cause it will be changed.

Grab your magic wand, mode is add, match mode rgb, tolerance 20, feather 0, and click on the white border, or whatever color you used. Go to effects, 3d effects, reflection effects, kaleidoscope- image area settings are -100,-100,196,76, and Kaleidoscope settings area is 6,0,29. Edge mode is wrap. Keep selected.

Go to effects, 3d effects, cutout, v and h 4, opacity 100, blur 30, color black, fill interior unchecked.Repeat changing the 4 to -4.Select none.

One more time, go to image, add border, black, or the dark color you used for the first one, 10 on all directions.

Now is the time to resize your entire tag if you think it is too big. Go to image, resize, make sure lock aspect ratio, and resize all layers is checked at the bottom, change the percent drop box to pixels and choose your size, when you change one, the other should automaticly adjust. Make sure the resolution is at 72.

Add your copyright so it is clearly visible.

Add your name. If you want it to go up and down like mine, once you click on the text tool, click the drop down box under where it says direction, and choose the middle one. Convert to raster.


I added an inner bevel to mine, first get the magic wand and click inside each letter. Effects, 3d effects, inner bevel, in the drop down box, bevel 2, width 20, smoothness 25,depth 10, ambience 2, shininess 20, color white, angle 315, intensity 40, elevation 40.

Thats it, you are done.

©Angel Flower February 2009

Friday, January 30, 2009

Blaqua girls


This Tutorial was written by me, Angel Flower, from my own ideas. Any similarities to others is coincedence. All my tutorialsare registered with TWI.

For this tutorial you will need

Scrapkit. I am using a PTU kit called Blaqua by Shhh from Shhh scraps. You can purchase the kit here: http://www.fall3nangel.com/store/

Tube of choice-you will need two tubes. I am using the work of Keith Garvey. You must purchase a license from MPT, http://www.mypsptubes.com/, to usehis work.

Lets begin.

New image-600x600-transparent.

Add a new raster layer. Flood fill with white.

Choose a paper from the kit and paste as new layer. If it is too big, resize it by going to image-resize-start with about 85%, all layers unchecked.If it is still too big you can repeat this step.

Paste a frame as a new layer. Resize if needed using the pick too, the arrow tool, and drag the box by a corner to the size you want.

Grab your magic wand. Mode is add, match mode is rgb, tolerance 20, feather 0, contiguous and anti-alias checked.Click in the center of each frame. Go to selections-modify-expand by 2. Keep selected.

Make the paper layer you pasted active and go selections-invert-delete. Select none.
Give your frame layer a drop shadow by going effects-3d effects-drop shadow. I used -2,-2, 65,5,black.

Make a new layer right above your white background. Paste a paper of choice for your new background. Resize it if needed.

Make the paper we used for the frame active. Paste the tube you want inside the frame as a new layer. If needed, resize, position it so the part you want to use shows through the frame.


My frame had two sides so Once happy, duplicate your tubeand go image-mirror. Position this one so it shows through the second frame the way you want.

Grab your magic wand, same settings as before, and make your frame layer active. Click in the center of each side and go selections-invert. Make the first tube active and hit delete, do the same on the other tube layer. Select none.

Paste a charm as a new layer. Resize if needed. Make sure this layer is above the frame layer.


Position so it looks as though it is hanging off of the corner of the right frame. See my tag for reference.

Choose a flower and paste it as a new layer. Resize it if needed. Position on the left side of the frame. See my tag for placement.

Grab a different flower and resize if needed. Move this layer below the frame and frame paper layer. Position so it sticks out from underneath the frame in the center. See my tag for reference. Once happy with it, duplicate it and go image flip. Position this oneat the top center of the frame in the same way.

Now paste your main tube as a new layer. Position how you like or how i have mine. Give them a drop shadow of choice.

Paste one of the tags as a new layer. Position on the left side of the tag and move it below the flower layer. See my tag for reference.

I also pasted a butterfly at the top left corner under the same flower.

Now is the time to resize your entire tag if you think it is too big. Go to image-resize-make sure lock aspect ratio is checked. In the drop down box, choose pixels, and then make the size you want. When you change one the other will automaticly change. Make sure all layers is checked and click okay.

Add your copyright and postion it on the tag. Make sure it is clearly visible.

Add your name. Give it a drop shadow and position how you like.

Thats it, you are done.

©Angel Flower January 2009

Drops of Love


This Tutorial was written by me, Angel Flower, from my own ideas. Any similarities to others is coincedence. All my tutorialsare registered with TWI.

For this tutorial you will need

Scrapkit. I am using a PTU kit called Tear Drops of Love by Foxy at http://foxysdesignz.blogspot.com/. You can purchase the kit here: http://www.fall3nangel.com/store/


Tube of choice. I am using the work of Keith Garvey, you must purchase a license from MPT, http://www.mypsptubes.com/, to use his work.

Lets begin.New Image-600x600-transparent.

Paste a paper of choice as a new layer. If needed resize by going to image resize- i usually start with 85%. Make sure all layers is unchecked and lock aspect ratio is checked.If the paper is still too big, repeat this step until it is the right size.

Paste a frame as a new layer. I used a heart frame. If needed, resize either using the method we used above, or you can use the pick tool, the little arrow tool, and drag the box byone of the corners to the size you want it.

Choose a paper for the inside of the frame. Click on your background paper layer and paste the paper you chose as a new layer.

Grab your magic wand tool, Set it to the freehand mode. selection type is freehand, mode is add, feather 0, smoothing 0, anti-alias checked.

Draw a selection carefully the same shape as your frame but slightly larger then the inside of the frame without going over the outside edge.Selections-invert. Make sure your paper layer is active and hit delete. Select none.

Give the frame layer a drop shadow of choice.

Paste your tube as a new layer. If it is a sitting tube like mine, postition toward the bottom of the frame. Resize if needed. See my tag for reference.

Paste one of the cushions as a new layer. If needed, resize. Move this layer below your tube layer and position at the bottom of the frame so it looks like your tube is sitting on it. See my tag for reference.

Paste the envelope as a new layer. Position to one side of your frame. If needed resize it. Move this layer below the frame and frame paper and position so it sticks out of the side. Againsee my tag for reference. Duplicate this layer and go image mirror. Now you should have one on each side.

Paste one of the bears as a new layer. Make sure this layer is above the frame and tube layer.Resize if needed. Position on the left side in the middle of the cushion and envelope. See my tag for placement.

On the opposite side of the frame, paste a heart in the middle of the envelope and the cushion, and move it below the tube layer.

Paste one of the bows as a new layer. Resize, and position in the top center of the frame. See my tag for reference.

Choose one of the charms and paste as a new layer. Resize and position at the top left side of the frame. Once happy with it, duplicate and go image mirror. You should now have one on each side.

Paste the raindrops as a new layer. Move this below the frame layer. Resize and position as i have mine. You may need to use the eraser tool to erase any bits that hang out of the frame.

Give your tube layer a drop shadow of choice.

Now hide your paper background layer and go layers-merge visible.

Duplicate this merged layer. Give the duplicate a drop shadow of choice.

On the original, go to effects-reflection effects-kaleidoscope. Image area settings are -100, -100, 355, 90. Kaleidoscope settings are 6,0,29. edge mode is wrap.

Right click on this layer and lower the opacity to about 50.

Now is the time if you wish to resize your whole tag to do so. Just use the image-resize method, make sure all layers is checked this time.

Now add your copyright so it is clearly visible.

Add your name. Give it a drop shadow.

I also added noise to my layer that was kaleidoscoped. Go to adjust, add noise, and choose the percentage you like.

Thats it, you are done.

©Angel Flower January 2009

Do You Believe

here is another tutorial with no scraps used


This Tutorial was written by me, Angel Flower, from my own ideas. Any similarities to others is coincedence. All my tutorialsare registered with TWI.

For this tutorial you will need
Tube of choice. I am using the work of Sue Dawe, you must purchase a license from CILM, http://www.cilm.com/, to use her work.

Mask of choice, i used sg_fairyland-frame by Essex Girl. You can find her masks here http://www.essexgirl.uk.com/sg_masks.htm.

Filters: DSB flux- bubbles, Eye Candy 3.1- glass, Fantastic Machines -paint engine

Lets Begin.

New Image-600x600-tranparent.

New raster layer. Flood fill with white.

Get your preset shape tool and find a heart shape. Width is 10, create as vector and anti alias checked. Draw out a decent size heart. See my tag for reference.

Paste your tube as a new layer. Position the part you want to show through the heart. Resize if needed by using the little pick tool, which is the arrow tool, and drag the box by one of the corners to the size you want.

Make your heart layer active. Grab your magic wand, mode is add, match mode is rgb, tolerance 20, feather 0, anti-alias and contiguous checked. Click in the center of you heart shape. Selections-modify-expand by about 3.Selections-invert. Now if you are using a unicorn tube or something similar, do not hit delete. Grab your eraser tool, size about 32, and Make your tube layer active. Do not erase the front hooves or paws or whatever, only erase the other parts that stick out. See on my tag i erased the back hooves and tail parts but left the front so it looks like it is coming out of the heart. If you are using a different tube, then just simply hit delete, and Select none. Move the tube layer below the heart layer.

Right click on your heart layer and convert to raster.

Grab your magic wand again, same settings. Click inside the border of the heart, the colored part. Go to effects, plugins, eye candy 3.1-glass. Width 9, spacing 30, thickness 30, opacity 50, refraction 30, glass colormid to dark grey, i used #808080, brightness 100, size 40, direction 127, inclination 76.

Select none. Now click again inside the center of the heart. Selections-modify-expand by 3.
Make your white background active and add a new layer. Flood fill the inside of the heart with a color or gradient of choice.

Keep selected and use the same glass effect we used above. It will look different. Select none.

Make your tube layer active. Give it a drop shadow. I used -3,0.100,8,black.

Hide your background layer, the white layer, by clicking the little eye next to it. Now make one of the visible layers active and right click on it and choose merge visible. Now unhide your white background.

Add a new layer. Flood fill with a color or gradient of choice. Go to effects, plugins, fantastic machines paint engine. Just click random until you find one you like.

Now go to layers, load/save mask, load from disk, in the drop down box, find your mask, source luminance, hide all, and fit to canvas all checked. apply.

Right click on the mask layer and choose merge group.

Now duplicate your merged heart layer. On the original, go to effects, plugins, dsb flux bubbles. Settings are 21,50,50,51. Resize this layer by going to image, resize, choose 95%, and make sure all layers is unchecked.If there are any bits you dont like the looks of, use the eraser brush to erase them.

Duplicate the heart layer with the tube in it. Using your pick tool, the little arrow tool, drag by one of the corners till it is a small size. Place this in the lower right corner. See my tag for size and placement. Duplicate this smaller one and go image mirror.Now you should have one in each corner.

Grab your text tool, choose a scripty font, and type out the words Do You Believe..., or a saying of choice.Give this layer the same glass effect we used above. Give a drop shadow of choice. I used -2,-2,100,5, and black.

Now is the time to resize your entire tag if you think it is too big. Go to image, resize, in the first drop down box choose pixels instead of percent. Make sure lock aspect ratio is checked. Now change the height and width to the size you want. When you change one,the other will automaticly adjust.

Now add your copyright so it is clearly visible.

Add your name. Convert to raster. I used eye candy 3.1 inner bevel on mine. I just played with the settings till i found one i liked. Then give it a drop shadow of choice.

Thats it, you are done.

©Angel Flower January 2009

Moonshine

Here is my brand new tutorial with no kits at all called MoonShine. Click on the tag to see it full sized. Thank you to my dear friend kitty for inspiring me to get back into writing my own tutorials!


This Tutorial was written by me, Angel Flower, from my own ideas. Any similarities to others is coincedence. All my tutorialsare registered with TWI.

For this tutorial you will need: PSP , Animation shop

Tube of choice. I am using the work of Jessica Galbreth, you must purchase a license from CILM, http://www.cilm.com/, to use her work.
Filters: Fantastic machines paint engine
DSB flux-bubbles and bright noise
Eye Candy 4000 or 3.1

Lets begin.

New image-600x600-transparent.

Flood fill with white.

New layer, flood fill with a color or gradient of choice to compliment your tube.

Go to effects-plugins-fantastic machines-paint engine. You can just click random till you find one you like or use my settings:under brush- .58,.9,.00,.88,.8,.00-effect-.78, wrap edges unchecked- under stroke-type is uphill, input checked, .28,1.16,-120,120,144,-155direction channel select R.

Grab your preset shape tool. Choose the half moon1 shape or another half moon shape you may have. Create as vector and anti-alias checked,line style is solid,width is 6. Choose two colors or gradients lighter than your paper. Draw out your shape and position to the left of the tag. See my tag for reference of size.

Now right click on this layer and convert to raster. Selections-select all-selections-float. Then go selctions-modify-contract by 6. Again, go to selections float. Keep selected.

Effects-3d effects-cutout- offset is -5,-5, opacity 100, blur 36, shadow color-choose a slightly darker color than your shape, fill interior unchecked. Select none.

Back to your preset shapes, find a star shape. Use the same colors and settings as you did for the moon. Draw out a star. Position it so it sits kind of inside the empty spacenext to the moon. See my tag for reference. Convert to raster.

Now follow the same steps we used on the moon to do the cutout effect. Merge the moon and star together by right clicking on whichever one is the top layer and choose merge down.

Duplicate the moon and star layer.

On the original Go to effects-reflection effects-kaleidoscope- Image area settings are -72,68,157,90, Kaleidoscope settings are 8,0,30, edge mode is wrap. Give this layer a drop shadow of 0,0,54,15,black.

Duplicate this layer again. On the original, go to effects-plugins-dsb flux-bubbles-all settings at 50.

On your moon and star layer, give it a gradient glow or a glow by going to plugins-eye candy-I used 4000 but you can also use a plain glow in eye candy 3.1. In 4000, I used a size of under basic, i used a glow width of 5, soft corners 65, and 100 for opacity, draw only outside checked. Under color the opacity is 100, I chose the fat setting, you may or may not have to go back and fix you basic settings after choosing fat, I made the first color tag a darker color that complimented my shape, the second tab a very light color, and i added a third tab the same as the second, but you can play around and do it how you like.If you use eye candy 3.1, i would use a width of 10, opacity 100, opacity drop off is fat, draw everywhere unchecked, and use a very light color.

Duplicate your moon and star layer twice for a total of 3.

On the top one, go to selections-select all-float-then defloat- selections-modify-contract by about 15. Selections invert-selections float-then defloat. Now the outline and the glow of this layer should have the little marching ants around it. Keep selected.

Effects-plugins-dsb flux-bright noise-56 and mix. Keep selected and hide this layer by clickin the little eye next to it. Make the next moon and star layer active, repeat the bright noise filter but this time click the mix button once. Hide this layer and make the last moon and star layer active and again repeat the bright noise and click mix twice this time. Selections-select none.

Now add your tube, resize if needed either by going image-resize and start with about 85%, all layers unchecked, or you can use the little arrow tool and resize it by dragging one of the corners till it is the size you want. Position where you likeor how i have mine. Give it a drop shadow. I used 2,5,75,9, black.

Now is the time to resize your entire tag if you think it is too big. Go to image resize-choose your percentage or you can change the box to pixels and make sure that lock aspect ratio is checked, then choose the size you want it to be, make sure alllayers is also checked.

Now add your copyright so it is clearly visible.

Add your name. Give it a glow of choice, then a drop shadow of choice.

Now we are going to animate. Make sure the two moon and star layers we hid earlier are still hidden. Click on the visible layer. Go to edit, copy merged.

Now open animation shop and paste as new animation.

Back in psp, hide the visible layer, and unhidethe next moon and star layer and click on it to make it the active layer. Go edit, copy merged. Back to animation shop, edit, paste after current frame.

One more time, back to psp, hide this layer and unhide the last moon and star layer and make it active. Edit,copy merged, back in animation shop, paste after current frame. Click view animation and save and your done.

©Angel Flower January 2009