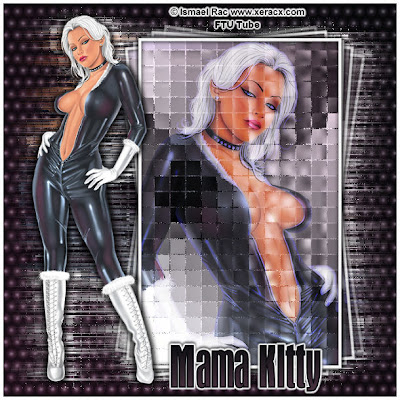
This Tutorial was written by me, Angel Flower, from my own ideas. Any similarities to others is coincedence. All my tutorialsare registered with TWI.
For this tutorial you will need
A tube of choice. I am using a Free to Use tube by Ismael Rac. If you wish to use this tube, visit his site here http://xeracx.com/v4/. NOTE: As of May 17,2009, there are only two of his tubes that are FTU, they are silk, and cat. I used the cat tube.
Filters-Xero porcelain, VM Natural- marble madness and cross weave, VM Extravaganza transmission, Mura's Meister copies, DSB Flux blastEye candy 4000(optional)
New image-600x600-transparent.
Choose two colors from your tube for the foreground and background. Change your foreground to gradient, find your foreground/background gradient in the drop box, style linear,angle 45, repeats 0. Flood fill your background layer with this gradient.
Grab your preset shape too, set to rectangle, width of 5, create as vector and anti-alias checked.
Make your foreground white, or a very light color from your tube, background null.Draw out a rectangle about the size of mine and place it in the right center of the tag. See my tag for reference.
Change your foreground to a light color and your background to a darker color from your tube, and again make your foreground to gradient and use same settings as before.
Grab your magic wand tool, mode is add, match mode is rgb, tolerance 20, feather 0, contiguous and anti-alias checked, Click in the center of the rectangle we made. Selections-modify-expand by 2.Keep selected and add a new layer, flood fill this layer with the gradient. Select none. Move this layer below the rectangle layer.
A
A
dd your main tube and position to the left of the rectangle, see my tag for reference, if needed resize using the pick tool, the arrow tool, and drag the box you see by a corner to the size you want. You can also resize by going to image-resize, make sure lock aspect ratio is checked and all layers unchecked, and start with about 85-90%. If needed you canalways repeat this step.
Now copy and paste the original tube again as a new layer, or if yours came with a close up use that, and position the part you want to see inside the rectangle. Once happy with the placement, grab your magic wand again and make your rectangle layer active. Click inside the rectangle, go to selections-modify-expand by 2, then selections invert, make the tube layer for the rectangle active again and hit delete. Select none. Move this layer below the rectangle layer but above the gradient.
Still on this tube layer, go to effects-filters-xero porcelain-50,200,134,0,0,255. Now double click on this layer and change the blend mode to hard light, and the opacity to 80.
Use the same porcelain effect on the gradient layer for the rectangle.
Use the same porcelain effect on the gradient layer for the rectangle.
Add a new layer just above your background layer. Flood fill with a medium color from your tube. Go to effects-filters-vm natural-marble madness-4,22,22,255. Now double click this layer and change the blend mode to soft light.
On the gradient layer we used for the rectangle, go to effects-filters-vm natural-cross weave-11,238,0,1,0,205,19. Dont worry if anything is outside the rectangle, we will adjust that.
Still on this layer go to effect-texture effects-mosaic antique-columns and rows 25, symmetric checked, then under mosaic settings-70,2,5. Repeat this effect with the same settings.
Now to get rid of any excess make your rectangle layer active and click inside with the magic wand, same settings, and go selections invert, make the mosaic layer active and hit delete.Select none.
On your rectangle layer-go to effects-3d effects-drop shadow-just click ok if it says you must convert to raster or something to that effect-settings-0,0,100,10,black.
Now hide your background layer, your layer just above that(the one we did the marble madness on), and your main tube layer. To hide them just click the little eye next to each one.What you should be left with is the rectangle, the tube inside the rectangle, and the mosaic fill for the rectangle.
Make your rectangle layer active and right click it and go to merge-merge visible.
Unhide the other layers now.
Unhide the other layers now.
Duplicate your merged layer and on the original go effects-filters-muras meister copies-in the preset drop box choose after image(rotate random),then from top to bottom settings are11,0,0,0,5,0,100,0,100,0,0,30,100, both boxes unchecked.
Give your tube layer a drob shadow of 0,5,80,10. Repeat the drop shadow changing only the 5 to -5.
Hide the two background layers, and make your tube layer active. Right click and merge visible. Unhide the two background layers.
Duplicate this merged layer and on the original go to effects-filters-vm extravaganza-transmission-3,8,40. Now go effects-filters-dsb flux-blast-direction left, click percntage and set to 20%, ok.Repeat the blast but change the direction to right.
Almost done. Duplicate this blasted layer and on the bottom on go effects-texture effects-mosaic antiqued-columns and rows 50, symmetric checked, mosaic settings-70,2,17.
Now is the time if you wish to resize your tag to do so. Use the image-resize-make sure all layers are checked and lock aspect ratio is checked, change the percent to pixels, and thenchoose the size you want. When you change one size, the other will automaticly change to keep your tag proportionate.
Now add your copyright so it is clearly visible. Add your name. I added a glow to my name using eye candy 4000, but this is up to you. The settings i used are under the basic tab-3,25,100-thenunder the color tab i chose fat and then slid the second slider bar back toward the first one a little, white for color, and 100 for opacity. I then gaVe it a drop shadow of-2,0,80,5,black.
Now you can leave your tag as is and save or you can add a border. To add a border simply go to image-add borders-in the first drop box it should say pixels, make sure the symmetric box is checked,size for all is 5, color is white(or a color of your choice).
Thats it, save and you are done!
©Angel Flower 2009

No comments:
Post a Comment