Friday, April 1, 2011

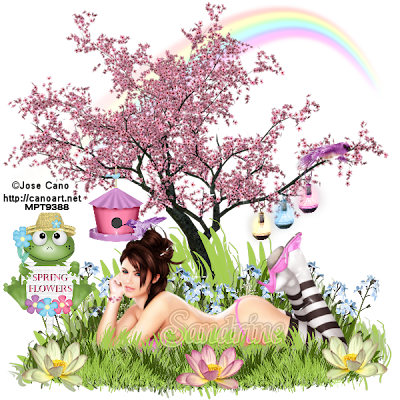
Spring in Bloom


This Tutorial was written by me, Angel Flower, from my own
ideas. Any similarities to others is coincedence. All my tutorials
are registered with TWI.

For this tutorial you will need
A tube of choice.I am using the work of Jose Cano. I purchased this tube when he was with MPT, You must now purchase his work from PTE in order to use it.

Filters: eye candy 4000(optional)

Scrap kit- I am using an awesome kit called Spring Flowers, by Rebellious Scraps, you must purchase this kit here The Creativity Box. You can visit her site here http://rebelliousscraps.blogspot.com

A Note: Anytime you need to resize something,such as an element or paper, you may do it one of two ways. The first method is by going to image-resize. Under pixel dimensions, make sure the drop box says percent, Lock aspect ratio should be checked and all layers unchecked, then change the width and height under the pixel dimensions the percent you think will work. I usually start with about 80 percent. If it is still too big, you can repeat the steps, adjusting the percent if needed. If it is too small you can undo by going to edit undo, and adjust the percent as needed.
The second way to resize something is to grab your pick tool, the little arrow, click on the layer you wish to resize and
as long as you have clicked the pick tool, you should see a type of box around the layer or element or whatever you are resizing.
Grab the box by a corning and drag it to the size you want. Keep in mind that most artisits do not allow you to make the tubes bigger, and be sure to check the tou for scraps as well.

New image-600x600 transparent

Open tree2 and paste as a new layer onto your canvas. Resize it by about 70 percent. Slide it up slightly to the top of your canvas.

Open grass2 and paste as a new layer. Again resize by about 70 percent. Move this layer toward the bottom of your tag.

Open flowers1 and paste as a new layer. Resize by 70 percent, then use the pick tool to make it even smaller. See my tag for about what size or just judge how you think it looks good. Place to the right of the canvas and position them in the grass.

Right click on this layer and duplicate it, then go image mirror. If needed repostion slightly. Duplicate this layer and move it over slightly and down
toward the bottom of the grass. Duplicate one more time and go image mirror. Move this layer right next to the one we just placed. Now it should look
like you have a row of flowers.

Open the garden frog and paste as a new layer. Resize by 70 percent then use the pick tool to make it smaller. Place to the left of your tag at the end
of the grass.

Paste your tube as a new layer and resize as needed. Position how I have mine if it is laying, or how you think it looks best if it is standing or sitting.
Now we are going to make it look like she is laying in the grass.

Duplicate your grass layer and move above your tube layer by dragging it in the layer palette. Use the pick tool to resize it to about half the size it is.
Duplicate it and go image mirror. Duplicate it one more time and position in the center of the two we just placed. See my tag for how it should look.

Paste flower5 as a new layer and resize by about 70 percent, then resize as needed with the pick tool. Position to the bottom right of the tag.
Duplicate and mirror this layer and position if needed.

Paste flower4 as a new layer and resize as you did the other flowers. Position in the bottom center of the tag.

Open the hanging birdhouse and paste as a new layer. Resize by about 50 percent, then resize it smaller with the pick tool. Position it to the left of the tree so it appears to be hanging off one of the branches. See my tag to get an idea of how it should look.

Open one of the birds, I used number 4, and paste as a new layer. Resize it with the pick tool. I had to go to image mirror for mine, and positon so it looks
like it is sitting on the birdhouse in some way.

Open all three lanterns. Paste one of them as a new layer. Resize it with the pick tool. Position so it looks as though it is hanging on the right side of the tree. Zoom in a few times, i went to 250 percent, and grab your eraser tool with a size of four. Erase only the part of one side of the handle that is on the branch. This will make it look more like it is actually hanging. Zoom back out when your are done. Repeat these steps for the remaing lanterns.

Paste the dandelions as a new layer. Resize by about 70 percent and place to one side of your tag. Duplicate and mirror this layer.
If you want, grab the eraser tool with a size about 15 and erase the parts of the dandelions that are on the body of your tube.

Open the rainbow and paste as a new layer. Resize by about 70 percent. I mirrored mine and placed it to the top right of the tag. move this layer below your tree layer.

Get one of the clouds and paste as a new layer. Resize aobut 70 percent and place so the end of the cloud is at the end of the rainbow. I then duplicated the cloud and made it smaller and placed it at the top left of the tag.

The last thing I did was I pasted another bird and resized it, then positioned it on the right branch of the tree.

Now is the time if you wish to resize your entire tag to do so. Go to image resize, make sure all layers and lock aspect ratio is checked, use pixels and choose the size you want.

Add the copyright so it is clearly visible. Add your name. I added a gradient glow of 3 to mine with eye candy 4000. Add a drop shadow of choice. Now double click the layer in the layer palette and change the blend mode to luminance legacy and lower the opacity to 70.

Thats it save and you are done.

©ANGEL FLOWER SCRAPS MARCH 2011

Tuesday, March 15, 2011

Rustic green


This Tutorial was written by me, Angel Flower, from my own
ideas. Any similarities to others is coincedence. All my tutorials
are registered with TWI.

For this tutorial you will need
A tube of choice.I am using the work of Caron Vinson. I purchased these images from CILM when they were around, but now In order to use Caron Vinsons work you must purchase it
at
CDO
Filters: eye candy 4000(optional)

Mask of choice

Scrap kit- I am using an awesome kit called Green Look, by Fantasy Dreams Designz. you must purchase this kit from
The Creativity Box. You can visit her site here
A Note: Anytime you need to resize something,such as an element or paper, you may do it one of two ways. The first method is by going to image-resize. Under pixel dimensions, make sure the drop box says percent, Lock aspect ratio should be checked and all layers unchecked, then change the width and height under the pixel dimensions to the percent you think will work. I usually start with about 80 percent. If it is still too big, you can repeat the steps, adjusting the percent if needed. If it is too small you can undo by going to edit undo, and adjust the percent as needed.
The second way to resize something is to grab your pick tool, the little arrow, click on the layer you wish to resize and as long as you have clicked the pick tool, you should see a type of box around the layer or element or whatever you are resizing.
Grab the box by a corning and drag it to the size you want. Keep in mind that most artisits do not allow you to make the tubes bigger, and be sure to check the tou for scraps as well.

New image-600x600 transparent

Copy and paste the frame labled El85. Resize it using the image resize method, 85%, all layers unchecked.

Paste one of the papers as a new layer, I used paper 6. Drag this layer below your frame layer.

Click on your frame layer and grab the magic wand, mode is add, match mode rgb, tolerance 20, feather 0. Click in the center of the empty space on both sides of the frame. Selections, modify, expand by about 4. Make your paper layer active by clicking it in the layer palette. Go selections invert, and hit delete on your keyboard. Select none. You should now only have paper showing through your frame.

Paste El78, the bronzish colored roses, as a new layer. Resize using the pick tool about like mine and then rotate it like mine. If you dont like using the pick tool to rotate then just go image, free rotate, 90 degrees left. Position toward the top of the frame to the left of the tag. See my tag for placement.
Duplicate this layer by right clicking it and choose duplicate. then go image mirror and if needed reposition slightly.

Grab your eraser tool with a size of about four and on both rose layers, carefully erase the part of the stems that go over the silver pare of the frame.
This will make it look as though the stems are sticking through the frame.

Open El64 and paste as a new layer. Resize it and position at the bottom center of the frame. Duplicate this layer and resize the duplicate. Postion it slightly to the right, then duplicate this layer and position to the left of the bigger flower. See my tag for placement.

Paste El130, the green leaves with the lillies, as a new layer and resize about 70%. If needed resize a little more using the pick tool. Position in the center of the frame and make sure this layer is below the flowers layer. Once you have it positioned, grab your eraser tool, size about 6, and zoom in on the silver metal parts of the frame in the center.
Make sure your green leaves is the active layer. Erase only the bits of stem that are above the silver metal pieces. Do not erase any of the leaves. See my tag for how it should look when done.

open El50 and El51, the orange and green butterflies. Paste the orange one,El50, as a new layer and resize it. Place on the left side of tag about where I have mine. Now paste the green one as a new layer and resize, make it a little smaller than the first one. Position this one just under the orange one and rotate it slightly using the pick tool. Duplicate this green one and place at the bottom left corner of the frame. Now duplicate the orange butterfly layer, resize it so it is about the same size as the green ones, and position in between the two green ones, rotate it slightly in the opposite direction using the pick tool. See my tag for how these should look.

Paste your tube as a new layer. Move this layer below the frame layer and postion the part you to show through one side of the frame. Duplicate this layer and go image mirror, if needed reposition just a little. Make your frame layer active and grab your magic wand tool, same settings as before, click in the center of both sides of the frame. Selections, modify, expand by about 4. click on one of your tube layers and go selections, invert, hit delete on your keyboard, now click on the other tube layer and hit delete. Now the only part of the tube that should be left is the part showing through the frame. Select none.

Give your frame layer a drop shadow by going effects, 3d effects, drop shadow, 0,0,100,10, black.

Click on your very bottom layer. If it is not blank, add a new layer and drag the new one to the bottom. Either paste a paper of choice as a new layer or flood fill with a color or gradient of choice.
Add your mask by going layers, load/save mask, load from disk. Find your mask in the drop down box, click source luminance, click fit to canvas, click hide all mask.
once happy with the mask, right click the mask layer and go merge group.

I then added another tube and resized it so that it looks as though she is sitting on the flowers. Give this tube a drop shadow of choice.

Now is the time if you wish to resize your entire tag if you wish to make it smaller. Go to image resize, all layers and lock aspect ratio checked, pixels instead of percent and choose your size.

Now add your copyright so it is clearly visible. Add your name in a font and color of choice. I added a gradient glow from eye candy 4000 to my name, but this is up to you. Add a drop shadow of choice, i used 2, -2, 100,2, black.

Thats it save and you are done.

©ANGEL FLOWER SCRAPS MARCH 2011
Sunday, February 20, 2011

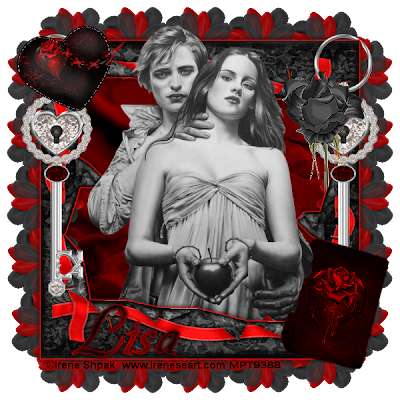
Eternal Passion


This Tutorial was written by me, Angel Flower, from my own ideas. Any similarities to others is coincedence. All my tutorialsare registered with TWI.

For this tutorial you will need
A tube of choice.I am using the work of Irene Shpak. In order to use the image in this tutorial you MUST purchase it from MPT.

Filters: Eyecandy 4000 gradient glow(optional)

Scrap kit- I am using an awesome kit called Edwards Passion, by EAL Designz. you must purchase thiskit from The Creativity Box. You can visit her site here
http://ealdesigns2.blogspot.com/
A Note: Anytime you need to resize something,such as an element or paper, you may do it one of two ways. The first method is by going to image-resize. Under pixel dimensions, make sure the drop box says percent,Lock aspect ratio should be checked and all layers unchecked, then change the width and height under the pixel dimensionsthe percent you think will work. I usually start with about 80 percent. If it is still too big, you can repeat the steps, adjusting the percent if needed. If it is too small you can undo by going to edit undo, and adjust the percent as needed.
The second way to resize something is to grab your pick tool, the little arrow, click on the layer you wish to resize and as long as you have clicked the pick tool, you should see a type of box around the layer or element or whatever you are resizing.Grab the box by a corning and drag it to the size you want. Keep in mind that most artisits do not allow you to make the tubes bigger, andbe sure to check the tou for scraps as well.

New image-600x600 transparent

Copy and paste paperfold1 as a new layer. You will not be able to see it at first, we will fix that. Go to image resize, choose percent and make it about 35, all layers unchecked. Repeat this resize with the same settings. Now you should be able to see the paperfold.

Duplicate this layer and go image mirror, then image flip. Right click on the top layer and go layers merge down. Thiswill be our frame.

Open paper 59 and paste as a new layer. Resize twice in the same way we did before with the same settings. Drag this layer below the frame layer.Use the pick tool, the little arrow, and grab one corner of the box around the paper and slightly drag it to make it fit just inside the frame. Do the same with the opposite diagonal corner of the one you just did. So if youused the right top corner first, then use the bottom left corner for the second time. Now none of your paper should be stickingout of the frame.

Open flower1 and paste as a new layer. Again resize by 35 percent twice. Then use the pick tool to adjust the size by dragging only one corner till its the size you want. You can use my tag as a guide for the size. Move the flower toward the bottom right side of the frameand position so its half on and half off the frame. Now drag this layer below the frame and paper layers.

Duplicate this layer four times so you end up with a total of five. arrange them in a line going up the side of the frame. Hide your paper layer and frame layer by clicking the eye next to each layer. Now right click on the top flower layer and go layers merge visible. All your flowers should now be on one layer.Unhide your paper and frame layer now.

Duplicate your merged flowers layer and go image mirror. Duplicate this layer and go image-free rotate-90 degrees left-rotate single layer around canvas center checked,all layers unchecked. One more time, Duplicate this layer and go image flip. Now you should have flowers all around your whole frame.

This part is up to you, I added a gradient glow to my frame layer using eye candy 4000. The settings are under basic width 3,soft corners 25,overall opacity 100, draw onlyoutside checked. Under the color tab choose the color you want,I used a brighter red, then i clicked just just under the long rectangular color bar so it added a second color tab.

Add a drop shadow to your frame by going effects, 3d effects, drop shadow, 0,0,100,10black.

Paste your tube as a new layer. If needed resize your tube just a little using the pick tool, so if fits nicely in between the folded paper pieces inside of the frame, dont worry if any bits will stick out of the frame, we will fix that. See my tag if needed for how the tube inside the frame should look.Drag this layer below the frame layer but above the paper layer. Grab your magic wand tool, mode is add, match mode rgb, tolerance 20. Make your frame layer active and click in the center of your frame with the wand. Go to selections, modify expand by about 20. Keep selected and make your tube layer active,selections invert, DO NOT HIT DELETE, grab your eraser tool, size about 47, hardness 83, step 34, density 100, thickness 100, rotation 0 , opactiy 100, erase only the bits that stick out of the bottom of theframe. Leave the ones at the top alone.

Now duplicate your tube layer and drag this layer to the top. Grab your magic wand tool, make the frame layer active and click inside, go to selections modify epand by 1. Now makeyour top tube layer active and go selections invert, grab the eraser tool and erase only the bits sticking out of the bottom of the frame. Select none. If needed, see my tag for howthis will look.

Paste the stitched heart as a new layer. Resize once by thirty five percent. Then use your pick tool to make it smaller. Place it on the left top corner of the frame and slightly rotate it using the pick tool. To rotate it, just click the pick tool and move the mouse over the little square that comes out from the center of the box. When you see the the two double arrows click and hold the mouse button and turn it the way u want.

Open the stemmed rose3 and paste as a new layer. Resize once by 35 percent, then again by 45 percent. Move this layer to the right side of the frame and place like i have mine. Once happy with the placement, duplicate it and move this duplicate below the frame and tube layer. Click on the rose layer that is at the top. Grab your eraser tool and erase bits of the stem and leaves that show on the frameto make look like the rose is coming out from under the frame. see my tag for reference. If any bits stick out of the edges of the frame, you need to erase these bits from both rose layers.

on the top rose layer go to effects, edge effects, enhance.

Open the heart key and paste it as a new layer. Resize it by 35 percent, then again by 45 percent. Place to the right of the tag and put the ring so it looks as though it is hanging off the frame. Grab your eraser tool with a size of about 16, erase very carefully just a tiny bit of the ring where the corner of the frame is. Now it should really look like it is hanging off the frame. See my tag for reference.Move this layer under the top rose layer.

Duplicate this key layer and go image mirror, and move it below the stitched heart layer.

Open tag 2 and paste as a new layer. Resize twice by 35 percent, then make a little smaller using the pick tool. Position this to the right bottom corner of the tag and slightly rotate it to the right. See my tag for reference. This layer should be above your key layer. I then chose to slightly adjust the color of it by going to adjust, hue/saturation/lightness, colorize is checked, hue is 360, saturation 100, lightness is -6.I then went effects, edge effects, enhance.

Now is the time if you wish to resize your entire tag to do so. Go to image resize, choose pixels instead of percent, lock aspect ratio and all layers checked, choose the size you want and hit ok.

Add your copyright so it is clearly legible. Add your name in a font and color of choice. I then gave my name a gradient glow with the same settings as before. Give it a drop shadow of choice.

Save and you are done.
©angel flower February 2011

Wednesday, February 16, 2011


This Tutorial was written by me, Angel Flower, from my own ideas. Any similarities to others is coincedence. All my tutorials
are registered with TWI.

For this tutorial you will need
A tube of choice.I am using the work of Barbara Jensen. In order to use the image in this tutorial you MUST purchase it from http://www.eroticartistgallery.com/

Filters: Xero radiance, Eyecandy 4000 gradient glow(optional)

Scrap kit- I am using an awesome kit called Blue Valentine, by Wacky Winnie Designz. you must purchase this kit from
The Creativity Box. You can visit her site here http://www.wackywinniedesignz.blogspot.com/

A Note: Anytime you need to resize something,such as an element or paper, you may do it one of two ways. The first method is by going to image-resize. Under pixel dimensions, make sure the drop box says percent, Lock aspect ratio should be checked and all layers unchecked, then change the width and height under the pixel dimensions the percent you think will work. I usually start with about 80 percent. If it is still too big, you can repeat the steps, adjusting the percent if needed. If it is too small you can undo by going to edit undo, and adjust the percent as needed.
The second way to resize something is to grab your pick tool, the little arrow, click on the layer you wish to resize and as long as you have clicked the pick tool, you should see a type of box around the layer or element or whatever you are resizing.
Grab the box by a corning and drag it to the size you want. Keep in mind that most artisits do not allow you to make the tubes bigger, and be sure to check the tou for scraps as well.

New image-600x600 transparent

Copy and paste frame1 as a new layer. Resize it twice by 75 percent.

Paste a paper of choice as a new layer, I used paper2. Move this layer below the frame layer. Grab your magic wand tool mode is add, match mode is rgb, tolerance 20, contiguous and anti alias checked. Make your frame layer active and click inside the center of it. Selections-modify-expand by about 6. Make your paper layer active and go selections-invert and hit delete on your keyboard. You should now only have paper showing through the frame.

Paste your tube as a new layer. Move this layer below the frame layer. Position it so the part you want shows through the frame.
Grab your magic wand and make your frame layer active. Click in the center of the frame. Once you have the dancing ants go to selections modify expand by 1. Go back to your tube layer and go selections invert. Hit delete on your keyboard. Select none

Still on your tube layer, go to effects-plugins-Xero radiance-Strangeness 128,Charm 50,Truth 128, Beauty 185

Copy and paste Gerber1 as a new layer. Resize it as needed and rotate it slightly using the pick tool and position how u like on the top left corner/side of the frame.

Paste your tube again as a new layer. Resize if needed. Position how u like on the tag. I went to image mirror on mine and placed it toward the bottom of my frame.

Copy and paste rose2 as a new layer. Resize it how you like. Move this layer below your tube layer. Position to the right side of the frame and use the pick tool to rotate it slightly so the stem is on the frame but under your tube. See my tag for how it should look. Once happy, duplicate your rose and resize the duplicate so it is a little smaller and position like mine or how you like.

Give each rose layer a drop shadow by going effects-3d effects, drop shadow. I used 0,0,100,10 black. Also give your other flower layer a drop shadow, I used 0,0,80,5 black for that one.

Give your main tube a drop shadow, I used -3,2,60,10,black.

I then opened the stars1 and pasted it as a new layer. I moved the layer to the bottom of my tag and resized it twice by 75 percent, then adjusted it how
i wanted with the pick tool.

One last thing i added was the little bag 1. I resized it so it was small and moved it below my tube layer so it looks as though its under her hands.

Now is the time if you wish to resize your entire tag to do so. Go to image resize- make sure all layers and lock aspect ratio are checked, choose pixels
instead of percent and make it the size u want.

Add your copyright so it is clearly visible. Add your name in a font and color of choice. I added a gradient glow to mine using eye candy 4000. I then added a
drop shadow.

Thats it, save and you are done!
©angel flower february 2011

Sunday, January 30, 2011

No Escape


This Tutorial was written by me, Angel Flower, from my own
ideas. Any similarities to others is coincedence. All my tutorials
are registered with TWI.

For this tutorial you will need
A tube of choice.I am using the work of Unholy Vault Designs. In order to use the image in this tutorial you MUST purchase it from
MPT.

Scrap kit- I am using an awesome kit called Broken Valentine by Broken Dreamz Scrapz, you must purchase this kit from
The Creativity Box. You can visit her site here

Filters-eyecandy 4000 optional

A Note: Anytime you need to resize something,such as an element or paper, you may do it one of two ways. The first method is by going to image-resize. Under pixel dimensions, make sure the drop box says percent, Lock aspect ratio should be checked and all layers unchecked, then change the width and height under the pixel dimensions the percent you think will work. I usually start with about 80 percent. If it is still too big, you can repeat the steps, adjusting the percent if needed. If it is too small you can undo by going to edit undo, and adjust the percent as needed.
The second way to resize something is to grab your pick tool, the little arrow, click on the layer you wish to resize and as long as you have clicked the pick tool, you should see a type of box around the layer or element or whatever you are resizing.
Grab the box by a corning and drag it to the size you want. Keep in mind that most artisits do not allow you to make the tubes bigger, and be sure to check the tou for scraps as well.


New Image-600x600 transparent

Open element 41 and paste as a new layer. Resize by about 85 percent.

Choose a paper and paste it as a new layer. Drag this under the wordart layer so you can see what you are doing. Resize by about 75 percent.

Click on the wordart layer. Grab your selection tool, if it is set to the magic wand then click the little arrow next to it and choose selection. Type is ellipse, mode is add, feather 0, anti alias checked. Click in what you think is the center of the word art and draw an ellipse to the edges of the wordart. If you look at my tag, you will see how the paper looks which will give you an idea of how the selection should look. It took me a few tries to get it just right. If you make a mistake just go to selections, select none and try again. Once you are happy with the selection, go to selections invert, and make the paper layer active and hit delete.
Select none.

Open element 20, the red rectangular frame, and paste as a new layer. I did not resize mine. Give it a drop shadow of choice by going effects, 3d effects,
drop shadow. I used 0,-2,100,10,black.

Paste element 1 as a new layer and resize as needed. Position at the top left of the frame and rotate it slightly using the pick tool. Give this a drop shadow of choice.
I used -1,2,100,5,black.

Grab element 58 and paste as a new layer. Resize if needed, position at the bottom right corner of the frame and rotate the opposite direction as the one we just did. Give this a drop shadow, I used 1,-2,100,5,black.

Open one of the roses, I chose number 42. Paste as a new layer. Resize it and go to image free rotate, 90 degrees left. Position across the bottom of the frame. Move this layer under the heart layer. Give this a drop shadow, I used 0,0,100,5,black.

Paste your tube as a new layer. Resize if needed but dont worry if some of it hangs out of the frame. Move it below the frame layer and postion it so the part you want shows through the frame. Click on your frame layer and grab your magic wand. Mode is add, match mode RGB, tolerance 20, feather 0. Click in the center of your frame layer. Go to selections, modify, expand by about 4. Keep selected and make your tube layer active by clicking it. Go to selections, invert, and hit delete on your keyboard. Select none.
Give your tube a drop shadow. I used 0,0,100,10,black.

Open element 30. Paste as a new layer and move this layer under the frame layer. Position this to the left of the tag so the ends hang over the paper a little. We will fix that part in minute. Duplicate the layer by going image duplicate, and go image mirror. This should now be directly on the opposite side of the tag. If needed place it into position. Once happy with it, go layers merge down. They should both be on one layer now.

Duplicate the merged layer and go image flip. If needed move this layer into position so it looks like mine, or move it to how you like it.
Merge this layer with the other one again by going layers merge down.

Grab your eraser tool, shape is round, size about 50, hardness 80, step 1, density 100, thickness 100, rotation 0,opacity 100. Carefully erase the bits of wire hanging over the edge of the paper on both sides.

Now is the time if you wish to resize your tag to do so. Go to image resize, make sure all layers and lock aspect ratio is checked. Change the percent to pixels and choose your size.

Add your copyright so it is clearly visible.

Add your name in a font of choice. I chose to give the name a glow using eye candy 4000 gradient glow, with a size of 3 and using two colors. If you dont have this just give it a drop shadow. If you used darker colors like i did you may want to give it a light gray or white shadow instead of black.

thats it, save and you are done.

©angelflower January 2011

Saturday, January 29, 2011

TICKLE ME WITH FEATHERS


click to see the tag full size

This Tutorial was written by me, Angel Flower, from my own ideas. Any similarities to others is coincedence. All my tutorials are registered with TWI.

For this tutorial you will need
A tube of choice.I am using the work of Elias Chatzoudis. In order to use the image in this tutorial you MUST purchase it from MPT.

Scrap kit- I am using an awesome kit called Broken Valentine by Broken Dreamz Scrapz, you must purchase this kit from The Creativity Box. You can visit her site here


A Note: Anytime you need to resize something,such as an element or paper, you may do it one of two ways. The first method is by going to image-resize. Under pixel dimensions, make sure the drop box says percent,Lock aspect ratio should be checked and all layers unchecked, then change the width and height under the pixel dimensions the percent you think will work. I usually start with about 80 percent. If it is still too big, you can repeat the steps, adjusting the percent if needed. If it is too small you can undo by going to edit undo, and adjust the percent as needed.
The second way to resize something is to grab your pick tool, the little arrow, click on the layer you wish to resize and as long as you have clicked the pick tool, you should see a type of box around the layer or element or whatever you are resizing.
Grab the box by a corning and drag it to the size you want. Keep in mind that most artisits do not allow you to make the tubes bigger, and
be sure to check the tou for scraps as well.


New Image-600x600 transparent

Copy and paste element 4, it kinda looks like a window, as a new layer. This will be our frame. I did not resize mine but u can resize yours if needed.

Copy and paste a paper of choice, I used paper 10. Resize twice by about 75 percent. Adjust the size if needed using the pick tool.
Put this layer under the frame layer.

Open element 70. Resize by about 75 percent, then use the pick tool to adjust so it fits nicely across the bottom of the frame. See my tag for reference.

Paste one of the candles as a new layer, I used number 13. Resize with the pick tool and place at one of the bottom corners of the frame. Duplicate this layer
by going image duplicate, and then go image mirror. You should now have one on each side of the frame.


Paste element 27, the red and black corset thing, as a new layer, resize as needed and move this layer below the frame but above the paper. Position to one side so it
shows through the frame.

Paste element 9, looks kinda like a garter, as a new layer and resize as needed to make it toward the bottom of the corset. See my tag for reference.

Click on the corset layer and go layers merge down. Your corset and your garter should now be one layer. Duplicate this layer and go image mirror. Place
into position so it shows through the other side of the frame.

Open one of the stemmed roses, i used number 50. I had to rotate mine by going image free rotate, 90 degrees left. Resize as needed and postion on one side of your frame.
Move this layer to just above the frame layer. Once happy with placement, go duplicate and mirror. Postion if needed on the other side of the frame.

Open a pair of the wings, I used number 14. Paste as a new layer and resize. Move to the left of the frame and drag this layer under the paper layer. See my tag for how it should look. Once happy with it, duplicate and mirror. Put into position if needed. Merge these two layers together like we did before. Duplicate this merged layer and go image flip. Move this layer up closer toward the first set of wings. Again see my tag for how this should look.

For each of the wing layers, I went to effects, edge effects, enhance.

Paste your tube as a new layer and position just above the frame layer. I resized mine a little and put it in the center of the frame.

Give your tube and each of your element layers a drop shadow of choice by going effects-3d effects-drop shadow. Play around till you find one you like.

I also decided to place the black feather on my tag. I resized it and placed one each side of the frame at the bottom, then i merged them together and duplicated
that layer, then flipped it and moved the flipped layer under the frame layer.

Now is the time to resize your entire tag if you wish to do. You do this by going image resize, make sure all layers is checked and lock aspect ratio is checked, change the percent to pixels and choose your size.

Once happy with the size of your tag, add the copyright so it is clearly visible. Add your name in a font of choice.
Give it a drop shadow. Save and you are done!

©angel flower January 2011

Saturday, January 15, 2011

Sweetness of Pink


Click the tag to see it full size

This Tutorial was written by me, Angel Flower, from my own ideas. Any similarities to others is coincedence. All my tutorialsare registered with TWI.

For this tutorial you will need A tube of choice.I am using the work of Jose Cano.
In order to use the image in this tutorial you MUST purchase it from
MPT.

Scrap kit- I am using an awesome kit called Pink Chocolate Sweets by Miss Foxys Designs, you must purchase this kit from
The Creativity Box. You can visit her site here
http://missfoxysdesigns.blogspot.com/

A Note: Anytime you need to resize something,such as an element or paper, you may do it one of two ways. The first method is by going to image-resize. Under pixel dimensions, make sure the drop box says percent,Lock aspect ratio should be checked and all layers unchecked, then change the width and height under the pixel dimensionsthe percent you think will work. I usually start with about 80 percent. If it is still too big, you can repeat the steps, adjusting the percent if needed. If it is too small you can undo by going to edit undo, and adjust the percent as needed.The second way to resize something is to grab your pick tool, the little arrow, click on the layer you wish to resize and as long as you have clicked the pick tool, you should see a type of box around the layer or element or whatever you are resizing.Grab the box by a corning and drag it to the size you want. Keep in mind that most artisits do not allow you to make the tubes bigger, andbe sure to check the tou for scraps as well.

New Image-600x600-transparent.

Open paper 13 and paste as a new layer. You will need to resize this. I resized mine by 65 percent.

Grab your magic wand, mode is add, match mode rgb, tolerance 20, anti alias checked, outside. Click in the center of the paper.You should now the the little dancing ants around the plain paper only. Go to selections invert,then go selections-promote selection to layer. Selections-select none. Now you should have another layer with the folded paper on it alone.

open one of the heart print frames, I used number 2, and paste as a new layer. Resize about like mine,about 60 percent, and go image mirror. Position on the top right corner of the paper. See my tag for reference.

Paste the rose2 as a new layer. Resize it about like mine and place at the top of the frame so it slightly covers the edge of the folded paper.See my tag if needed. Duplicate this twice and place the in a row as i have mine. If you made your roses smaller than mine, you will need to duplicate your roses a few more times so they fit like mine.

On each rose layer, I chose to sharpen them. Click on your first rose, go to adjust, sharpness, sharpen. Do this to the remaining roses.

Now paste the rose again, this time make it smaller than the last ones, postion along the heart frame on the left side of it so the firstsmall rose touches the edge of the bigger one. If needed see my tag for placement. Duplicate the rose as needed and postion following the edge of the left side of the frame. I used the same sharpen tool for each of these. I also gave each of these smaller roses a drop shadow.Go to effects, 3d effects, drop shadow, 0,0,75,4,black.

Open one of the flowers, I used flower 1. Paste as a new layer and resize. These should be about the size of the small roses.I duplicated mine so I had a total of five. Position them along the right side of the heart frame up to the edge of the paper.The first one should be just under the small rose at the tip of the heart. See my tag if needed. Again i repeated the sharpen and thedrop shadow.

Paste the flower again, this time leaving it a little bigger. I used five of these also. Position the first one under the small flower layersat the right edge of the paper. Position however many you need in a straight row down until you get to the folded paper part. See my tag if needed.and once more apply the sharpen and drop shadow to each one.

Open the cherry blossom 2. Paste as a new layer. Go image mirror. Resize and place to the right of the tag on top of the bigger flowers. Place how you likeor see my tag. Give it a drop shadow of choice.

Now i chose to paste one of the doodles so the paper back wouldnt look so plain. This is up to you. I used flowers and hearts 1. Paste it as a new layer.Resize and postion toward the bottom right of the tag. Move this layer so it is above the pink paper but below the folded part. I then duplicated this layerand went image, flip. I positioned it over the left of the tag.

Open the main tube you are going to use and paste it as a new layer. Put it into positon like mine, or where you like, If you need to resize it do so, or if you just have parts sticking out of the bottom or the side, You can grab the eraser tooland carefully erase them just enough so it doent stick out. The other way you can fix it is to grab the magic wand and change it to the selection too by clicking the little drop arrow next to it. Choose selection, type is rectangle, mode is add, feather 0, anti alias checked.Draw a rectangle around ONLY the parts you want to delete. Hit delete on your key board. Selections, select none.

Give your tube a drop shadow of choice.

Now open the tube you want inside the heart. Paste as a new layer and postion the part you want to show inside the frame.Resize to how you need it. Grab the magic wand tool, same settings as before, and click in the center of the frame. Selections,modify, expand by about 3. keep selected and click on your tube layer, selections invert, delete.

Double click this layer and change the opacity to 50.

Give the heart frame a drop shadow.

If you wish to resize your entire tag, now is the time to do it. To do the entire tag, use the image resize method, this time changing the percent to pixels and choosing the size, and make sure all layers is checked.

Once happy with it, add your copyright so it is clearly visible.

Add your name in a font of choice. I then went to layers, convert to raster, then adjust add noise,random, monochrome and 10 percent.Give it a drop shadow, i used 0,0,100,7,black.

Save and your are done.

©angel flower January 2011

Tuesday, January 4, 2011

Kupids love bug


This Tutorial was written by me, Angel Flower, from my own ideas. Any similarities to others is coincedence. All my tutorials are registered with TWI.

For this tutorial you will need
A tube of choice.I am using the work of Jennifer Janesko. In order to use the image in this tutorial you MUST purchase it from
CDO.

Scrap kit- I am using an awesome kit called Kupid Kitty by Wench Designs, you must purchase this kit from
The Creativity Box.

Filters-eyecandy 4000-this is optional


New Image-600x600-transparent.

Open one of the ruffles, I used ruffle3. Paste as a new layer and resize it if needed. Anytime you need to resize, you can go image-resize-choose percent instead of pixels, make sure all layers is unchecked, and start with 80. If it is too big you can resize again, if its too small, simply go edit, undo, and then do the resize again with a smaller percent. You can also resize by grabbing the pick tool, the little arrow, and grabbing one of the corners of the box and dragging it to the size you want. Once you have resized your ruffle, postion near the top of your tag. Duplicate it by going image-duplicate.
Now go image flip, and then image mirror. Leave it where it is for now. Duplicate it again, and this time go image-free rotate-all layers unchecked, rotate single layer around center checked, 90 degrees left.
Postion this to the left of your tag. Now duplicate this one and go image mirror, and then image flip. Now that we have four pieces postion them to form kind of a rectangle as I have mine. This will be our frame. Once all positioned, go to layers-merge visible.

Now if you wish to resize the frame we made, do that now to how you want it.

Copy and paste flower6,or a flower of choice, as a new layer. Resize it and postion at the bottom left corner of the frame. Duplicate it and go image mirror. If needed move into position on on the opposite corner of the frame.

Paste flower vine1 as a new layer and move this layer below the two flower layers we just pasted. Resize the flower vine and position it on the bottom part of the frame in between the two flowers on the corners. See my tag for placement.

Copy and paste a paper of choice as a new layer. Move this below your frame layer. I chose to resize mine by about 64 percent using the image resize
method, then I used the pick tool and adjusted the size by dragging a corner of the box so that it fit in the frame. You can do as I did or you can grab
the magic wand, click in the center of the frame, go selections modify-expand by about 3, then invert and on your paper layer hit delete.

Paste lollipop1 as a new layer. Resize it and position on the left side of the frame. Move this layer under the flower layers. I also rotated mine
slightly using the pick tool.

Open the lovebug2 and paste as a new layer on your tag. Resize to your liking and position on the right side of your frame. See my tag for reference how this
should all be looking. Duplicate the bug and resize the duplicate and place over your lollipop stick. Again see my tag for how it should look.

Give the two bugs a drop shadow. Effects,3d effects, drop shadow, on the litte one I used 0,1,70,5,black, and on the bigger one I used 0,-1,70,5,black.

Paste the rose vine3 as a new layer. Resize and position on the right side of the frame. Move this layer to just above the frame layer. I went to effects-edge effects-
enhance. Duplicate this layer and go image mirror. Place into position if necessary. See my tag if needed for how this should look.

I then chose to place a butterfly on the left side of my frame toward the top.

Paste your tube and resize as needed. If any part sticks out of the frame, use the magic wand and click in the center of the frame, then go selections invert, and on the tube layer hit delete.

I chose to use the filters xero porcelain and radiance on mine. This is optional. For the xero-porcelain effect I used 50,128,128,0,0,0. Then I applied xero radiance using 128,128,128,88.

Give your tube a shadow of choice, I used 0,0,50,7.

Paste wings1 as a new layer and move this to the very bottom of your layers. Move it to the left and toward the top of the frame so it sticks out from the side and just above the top. Resize slightly if needed. See my tag for rerference. Grab your eraser tool and erase the little part that sticks out further toward the middle top of the frame. Now duplicate this layer and go image mirror.
If needed slightyly reposition. On both wing layers I used the edge effects enhance.

Now is the time if you wish to resize your entire tag to do so by going image resize, choose pixels instead of percent, make sure all layers is checked and choose the size you want.

Add your copyright so it is clearly visible. Add your name. I added a gradient glow to mine using eye candy 4000 but this is optional. I used a glow width of 3 with two colors. I then added a drop shadow to it.

SAVE AND YOU ARE DONE!
©ANGEL FLOWER JANUARY 2011

Sunday, January 2, 2011

KITTY PLAYTIME


This Tutorial was written by me, Angel Flower, from my own
ideas. Any similarities to others is coincedence. All my tutorials
are registered with TWI.

For this tutorial you will need
A tube of choice.I am using the work of Keith Garvey. In order to use the image in this tutorial you MUST purchase it from
MPT.

Scrap kit- I am using an awesome kit called Kupid Kitty by Wench Designs, you must purchase this kit from The Creativity Box
here.

Filters-eyecandy 4000-this is optional


New Image-600x600-transparent.

Choose a frame, I used Frame7, copy and paste as a new layer. Resize by going image-resize-choose percent instead of pixels and change the number to 80. If this is still too big for you, you can resize again or you can click the pick tool in your psp, usually the little arrow, and drag the box you see by the corner to the
size you want.

Grab your magic wand tool, mode is add, match mode is RGB, tolerance 20, anti alias checked. Click inside the empty space/spaces of your frame. Go to selections, modify, expand by 2. Paste a paper of choice as a new layer, I used paper 21. Keep selected and go selections invert, then hit delete on your keyboard. This should remove any paper outside of the frame. Selections, select none.
Move your paper layer below your frame layer.

Click your frame layer to make it active. Effects, 3d effects, drop shadow. Use one of your choosing or I used 0,0,100,5 and black for color.

Paste a rose, I used rose 8, as a new layer. Resize it either by the image resize method or by using the pick tool and dragging the box to about the size of mine, or how u like it. Once you have it sized, grab your pick tool. Rotate the rose, you can do this with the pick tool by hovering over the small little rectangle that comes out of the center of the box, you will see two arrows if you hover over it. Click and hold it and move your mouse either up or down depending on which way you want it to go. Rotate it about like mine, or how you like, and then move it over to
the frame as I have mine.

Once you have it positioned, duplicate it and move the duplicate under your frame and paper layers. Go back to the top copy of the rose and grab your eraser tool. I used round shape with a size of 55, hardness 100, step 1, density 100, thickness 100, rotation 0, opacity 100. Erase the parts of the rose stem that are on top of the frame. I left mine so it looks as though its popping out from the side. You want to make it look like it is come out from under some part of the frame. Once you are happy with that, repeat the process but on the opposite side of the frame as i did mine.

Open one of the cats, I used cat10, and paste it as a new layer. Resize to your liking and position to the to the right side of the frame. See my tag for placement.

I then pasted one of the mice, mouse 6, as a new layer. Resize and Position this to the left and kind toward the top of the frame. Again see my tag for placement.

Paste your tube as a new layer. If needed resize it, move it below the frame but above the paper. Grab your magic wand, same settings as before, click on your frame layer and click inside the frame as before,selections, modify, expand by about 5, go back to your tube layer and go selections invert, hit delete. This should get rid of any part of the tube that was sticking out of the frame.
select none.

If you have another frame like I do, repeat the above steps for pasting the tube, the only two things I did differently was I went image, mirror, so the tube was facing the opposite way, then after it was all postioned and such, I changed the blend by double clicking it in the layer palette and changing the blend to hard light.

If you chose a double frame like I did, Choose another flower and paste it as a new layer above your frame layer. Resize and postion toward the top of the smaller of the two frames to the left side. If needed, rotate it some to make it fit how you want. I placed these all around my frame by pasting and resizing and rotating to make them look nice.

For finishing touches, I gave the cat a drop shadow of -1,0,75,black. I gave the mouse a drop shadow of 1,0,75,black. I pasted a bow on the top right side of my bigger frame. I gave that a
drop shadow of 0,0,75,black.

Now, if you are happy with your tag and the sizing of it, add your copyright so it is clearly legible. If you wish to resize your entire tag, do so before adding the copright. Go to image, resize, this time choose pixels and put the size you wish, make sure all layers is checked, and hit ok. Now add the copyright. Add your name in a font and colors of choice.Position how you like. I used eyecandy 4000 and added a gradient glow to mine but this is up to you. Give it a drop shadow of choice, I used 0,1,70,5,black.

Save your tag and you are done!

©angel flower January 2011