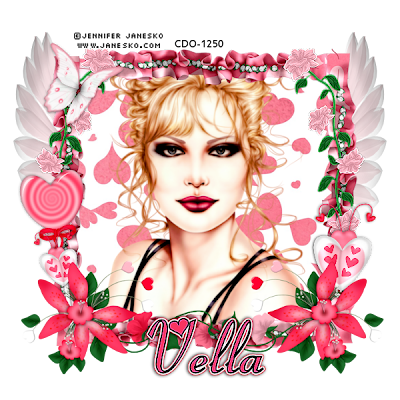
This Tutorial was written by me, Angel Flower, from my own ideas. Any similarities to others is coincedence. All my tutorials are registered with TWI.
For this tutorial you will need
A tube of choice.I am using the work of Jennifer Janesko. In order to use the image in this tutorial you MUST purchase it from CDO.
Scrap kit- I am using an awesome kit called Kupid Kitty by Wench Designs, you must purchase this kit from The Creativity Box.
Filters-eyecandy 4000-this is optional
New Image-600x600-transparent.
Open one of the ruffles, I used ruffle3. Paste as a new layer and resize it if needed. Anytime you need to resize, you can go image-resize-choose percent instead of pixels, make sure all layers is unchecked, and start with 80. If it is too big you can resize again, if its too small, simply go edit, undo, and then do the resize again with a smaller percent. You can also resize by grabbing the pick tool, the little arrow, and grabbing one of the corners of the box and dragging it to the size you want. Once you have resized your ruffle, postion near the top of your tag. Duplicate it by going image-duplicate.
Now go image flip, and then image mirror. Leave it where it is for now. Duplicate it again, and this time go image-free rotate-all layers unchecked, rotate single layer around center checked, 90 degrees left.
Postion this to the left of your tag. Now duplicate this one and go image mirror, and then image flip. Now that we have four pieces postion them to form kind of a rectangle as I have mine. This will be our frame. Once all positioned, go to layers-merge visible.
Now if you wish to resize the frame we made, do that now to how you want it.
Copy and paste flower6,or a flower of choice, as a new layer. Resize it and postion at the bottom left corner of the frame. Duplicate it and go image mirror. If needed move into position on on the opposite corner of the frame.
Paste flower vine1 as a new layer and move this layer below the two flower layers we just pasted. Resize the flower vine and position it on the bottom part of the frame in between the two flowers on the corners. See my tag for placement.
Copy and paste a paper of choice as a new layer. Move this below your frame layer. I chose to resize mine by about 64 percent using the image resize
method, then I used the pick tool and adjusted the size by dragging a corner of the box so that it fit in the frame. You can do as I did or you can grab
the magic wand, click in the center of the frame, go selections modify-expand by about 3, then invert and on your paper layer hit delete.
Paste lollipop1 as a new layer. Resize it and position on the left side of the frame. Move this layer under the flower layers. I also rotated mine
slightly using the pick tool.
Open the lovebug2 and paste as a new layer on your tag. Resize to your liking and position on the right side of your frame. See my tag for reference how this
should all be looking. Duplicate the bug and resize the duplicate and place over your lollipop stick. Again see my tag for how it should look.
Give the two bugs a drop shadow. Effects,3d effects, drop shadow, on the litte one I used 0,1,70,5,black, and on the bigger one I used 0,-1,70,5,black.
Paste the rose vine3 as a new layer. Resize and position on the right side of the frame. Move this layer to just above the frame layer. I went to effects-edge effects-
enhance. Duplicate this layer and go image mirror. Place into position if necessary. See my tag if needed for how this should look.
I then chose to place a butterfly on the left side of my frame toward the top.
Paste your tube and resize as needed. If any part sticks out of the frame, use the magic wand and click in the center of the frame, then go selections invert, and on the tube layer hit delete.
I chose to use the filters xero porcelain and radiance on mine. This is optional. For the xero-porcelain effect I used 50,128,128,0,0,0. Then I applied xero radiance using 128,128,128,88.
Give your tube a shadow of choice, I used 0,0,50,7.
Paste wings1 as a new layer and move this to the very bottom of your layers. Move it to the left and toward the top of the frame so it sticks out from the side and just above the top. Resize slightly if needed. See my tag for rerference. Grab your eraser tool and erase the little part that sticks out further toward the middle top of the frame. Now duplicate this layer and go image mirror.
If needed slightyly reposition. On both wing layers I used the edge effects enhance.
Now is the time if you wish to resize your entire tag to do so by going image resize, choose pixels instead of percent, make sure all layers is checked and choose the size you want.
Add your copyright so it is clearly visible. Add your name. I added a gradient glow to mine using eye candy 4000 but this is optional. I used a glow width of 3 with two colors. I then added a drop shadow to it.
SAVE AND YOU ARE DONE!
©ANGEL FLOWER JANUARY 2011
No comments:
Post a Comment