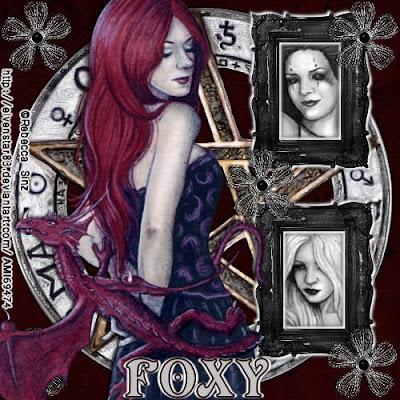
This Tutorial was written by me, Angel Flower, from my own ideas. Any similarities to others is coincedence. All my tutorialsare registered with TWI.
For this tutorial you will need
Three tubes of choice from same artist. I am using the work of Rebecca Sinz. In order to use the image in this tutorial you MUST purchase it from AMI, http://www.artisticmindsinc.com/.
Scrapkit I am using is a PTU kit by Foxy called Red of the Dragon, which you can purchase here: http://digitalchaos.net/store/
New Image-500x500-transparent
Choose a paper for your background and paste as a new layer. If needed, resize by going to image-resize-choose percent-make sure lock aspect ratio is checked and all layers is un checked.Choose about 85%. If needed repeat this step until the paper is the size you want.
Paste the pent_fd, see my tag for reference, as a new layer. I did not resize mine but you may if you wish. You can use the pick tool, which is the little arrow, to drag the box by a corner to the size you want.
Give it a drop shadow of h+v 0, opacity 100, blur 10, color black.
Paste one of the frames as a new layer and resize using the pick tool. See my tag for size. Position it to the right toward the top of the tag. Give it a drop shadow of 3,3,100,4,white.
Repeat this drop shadow only changingboth h+v to -3. Now repeat the drop shadow again but this time make the settings 0,0,100,5 black.
Duplicate the frame and postion directly below the first one. See my tag for placement.
Choose a paper to go inside the frames. Paste as a new layer. Move this layer below your frame layers. Resize by about 85% and position so it shows through both frames. Grab your selection tool and set it to rectangle. Mode is add, feather 0. Draw a selection a little bigger than the inside of the frame. Keep selected and do the same thing to the other frame. Now go to selections invert, make sure your paper layer is the active layer and hit delete on your keyboard.Select none. You should now only have the paper showing through the frame.
Pick one of your tubes to go inside your first frame. Paste it as a new layer and resize by 85%. Move this layer below the frame but above the papers. Position so the face shows through the first frame. Grab your selection tool again and makethe same selection as you did above. Go selections invert, make sure the tube layer is active and hit delete. Select none. Now repeat this using another tube for the second frame.
Change the blend mode on both tube layers to luminance legacy. To do this just double click on the layer you wish to change and under blend mode change it.
Now paste your main tube as a new layer. Position and resize as you like or how i have mine. I did not resize mine. Give it a drop shadow of 0,-2,100,5,black.
Now paste your main tube as a new layer. Position and resize as you like or how i have mine. I did not resize mine. Give it a drop shadow of 0,-2,100,5,black.
Paste a flower, or in this case it was called medal, as a new layer and resize with the pick tool. Position in the top left corner. Give it the same drop shadow we just used except change the blur to 2 instead of 5. Duplicate this layer and position in the right top corner. Duplicate again and positionin the bottom right corner. Duplicate this one and position in the bottom left corner. And one more time duplicate and position so it is on the left side of the two frames touching both corners, see my tag for placement.Make sure these are all above the frame layers.
Add your copyright so it is clearly visible. Add your name.
Give your name a drop shadow of 0,-3,100,2, white. then repeat changing the -3 to 3. Now give it another drop shadow of 0,0,100,5, black.
Save and you are done!
©Angel Flower April 2009
No comments:
Post a Comment