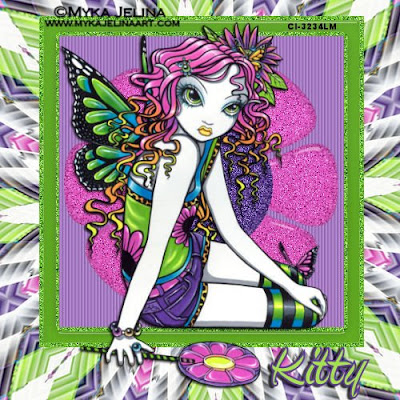
This Tutorial was written by me, Angel Flower, from my own ideas. Any similarities to others is coincedence. All my tutorialsare registered with TWI.
For this tutorial you will need A tube of choice. I am using the work of Myka Jelina.In order to use the image in this tutorial you MUST purchase it from CILM.
Filters-Eye candy 5 impact glass(you can substitute the glass effect in eye candy 4000 or 3.1),
Muras miester copies
New Image-500x500-transparent
New raster layer.Pick two colors from your tube for your foreground and background. In the materials palette, change your foreground to gradient, find the one that says foreground/background, angle 45, repeats 0, style linear. Flood fill with the gradient.
Grab your preset shape tool and set to rectangle with a width of 25. Foreground a color from your tube, background null. Draw out a rectangle about the sizeof mine. Go to selections, select all, then selections float, defloat. Again go to selections, modify, contract by 5. Selections, invert.
Selections float, and then defloat.Keep selected.
Go to adjust, add/remove noise, add noise, 50%, random, and monchrome. Select none.
Still on this layer, Repeat the selcetions, select all, float, defloat. And the selections, modify, contract by 5. Keep selected and go to EC5 Impact, glass, click the basic tab, 9.38,40,0, inside, glass color is a lighter or darker shade of the color you are using, 0,0,17,33,0,12.11,0. Select none. Merge this with the orignal vector layer rectangle if it is stillthere. Position toward the top center. If you dont have eye candy 5 impact, you can use the glass effect in eye candy 4000 or eye candy 3.1.
Grab your magic wand tool, mode is add, match mode is rgb, tolerance 20, feather 0, contiguous and anti alias checked. Click in the center of the frame. Add a new layer. Go selections-modify-expand by 5. Flood fill with another color from your tube. Keep selected. Go to effects-texture effects-blinds-width of 4, color white, opacity 45, nothing checked.Select none. Drag this layer below the frame layer.
Grab your preset shape tool again and choose a flower shape. I used flower five. Pick a color for your background color and make your foregound null. Draw out a flower that fits in the wholeframe. Position so it is centered. Convert to raster. I then changed my color and put my shape to ellipse to make the center of the flower. Make sure this is centered in the flower.
Convert to raster.Give both the flower and the ellipse the same glass effect we used above. Then go to adjust, add noise, gaussian and monochrome, this time about 25%. Do this to the flower and the center for the flower.
Add your tube and resize as if needed. Position how i have mine or how you think it looks best. Make sure this layer is above all the others. Give a drop shadow, i used 2,-2,75,2,and black.
Now hide your background layer and make one of the visible layers active. Right click and choose merge visible. Unhide your background layer.
Duplicate your merged layer. On the original, go to image resize, 60%, resize all layers unchecked and lock aspect ratio checked.Go to effects, plugins, muras meister copies, In the preset box at the bottom, choose wave(horizontal), 10,100,20,0,10,0,100,0,100,5,0,30,0.
Effects-texture effects-mosaic antique, columns and rows 25,symmetric checked, tile diffusion 50, grout width 2, grout diffusion 2.
Effects-texture effects-blinds- width of 4, opacity 65, color white, both boxes checked.
Effects-reflection effects-kaleidoscope-image area settings are 35,-64, 108, 70, kaleidoscope settings 8,4,40, edge mode repeat.
Now is the time to resize your tag if you wish to do so. Go to image-resize, choose pixels, make sure lock aspect ratio and all layers is checked, change the size to what you want.
Add your copyright so it is clearly visible.
Add your name and give a drop shadow of choice.
Save and you are done!
©Angel Flower April 2009
No comments:
Post a Comment